About fifteen minutes, plus however long you spend playing, which will be longer than fifteen minutes.
Effects live in the Effects Deck, a drawer at the right edge of the window. Tap X to open it; it holds the audio effects built into your Mac by Apple. In this lesson we’ll take one plain voice track and give it a little compression to even it out, a little EQ for clarity, and a whisper of reverb for polish.
Adding an Effect
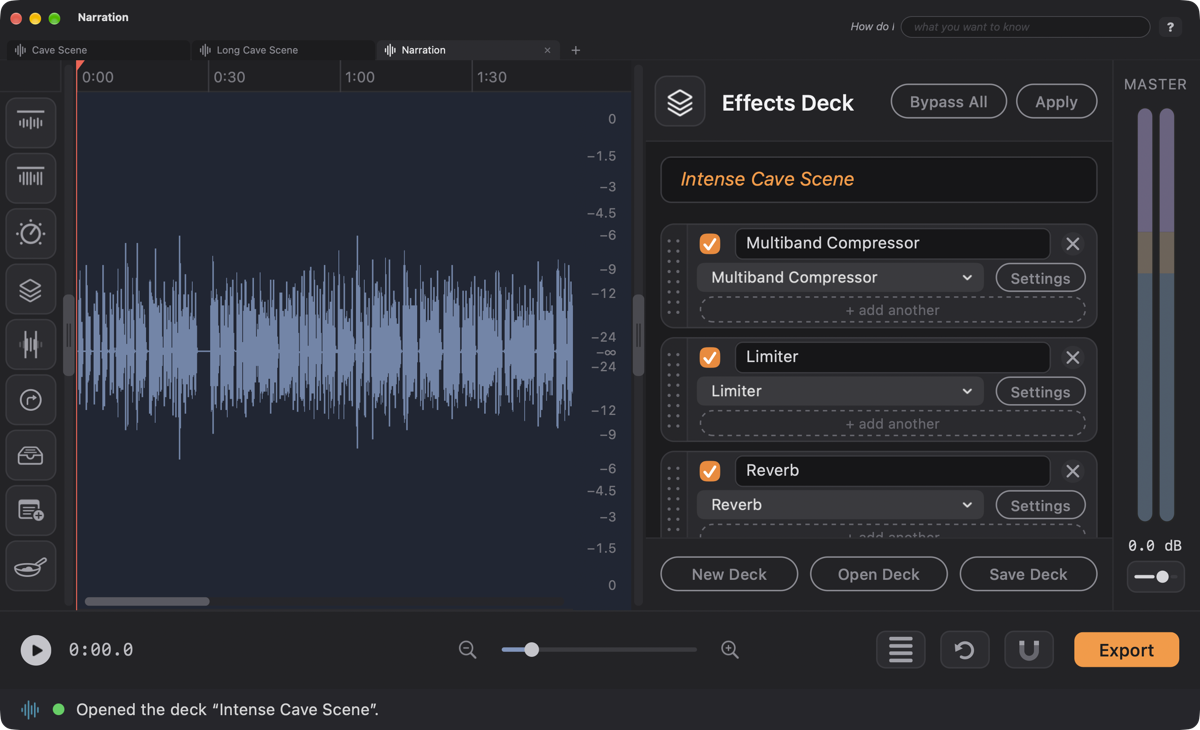
Choose the track (in Multitrack Mode, click its name), then tap X. The Effects Deck slides out. (In Multitrack Mode you can also click the three-card icon where the track’s FX button used to be.) Click + add another and the list of effects opens by itself. The most useful effects, the compressors and limiter, the EQs, and the reverbs, are right at the top. Pick one and its own window opens with all its controls. You can leave it open and adjust it while the project plays, which is the best way to learn what each control does.
The Effects Deck beside the waveform, with three cards in it.
Effects run in the order the cards are listed, and all of them run before the track’s fader. Drag a card by its dotted strip to change the order.
The checkbox on a card switches it off (bypass) so you can compare with and without. Bypass All at the top does the same for the whole deck. The x on a card removes it. Each of these can be undone.
A deck holds up to twelve cards.
The settings are saved with your project.
In Single Track Mode you hear the effects while you play, and Apply puts them into the audio. See Apply.
The FastTracker Cookbook: Ready-Made Recipes
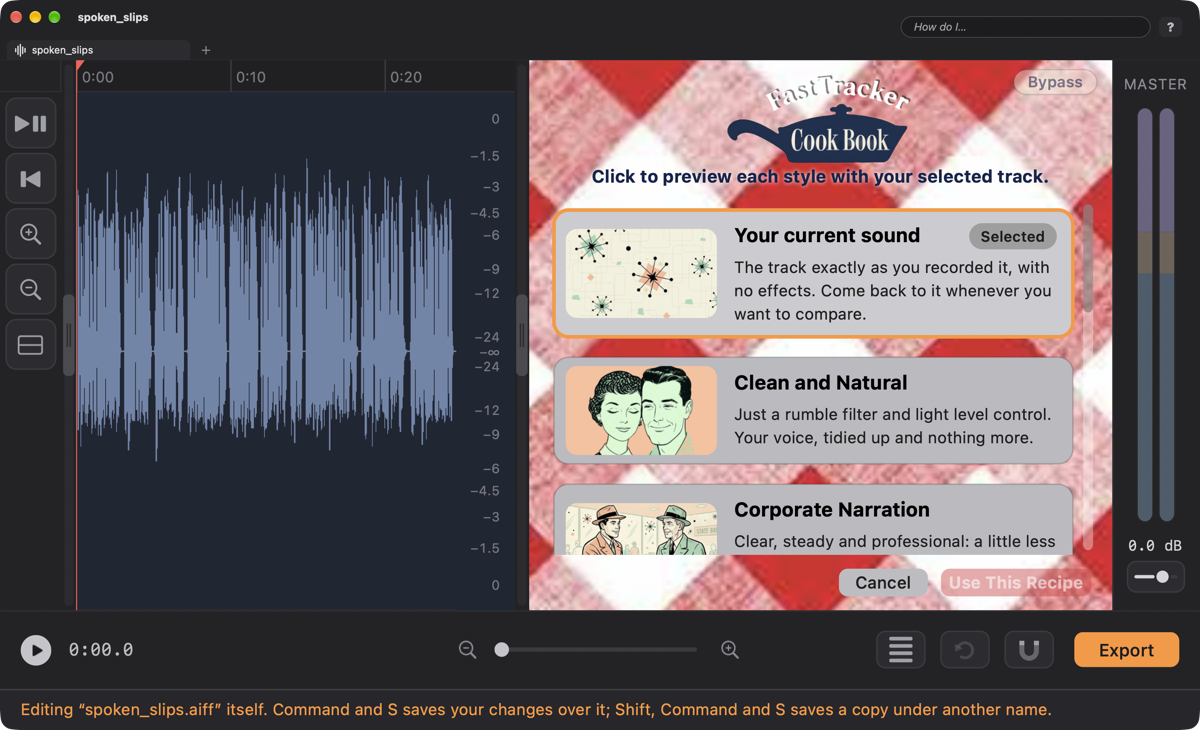
Not sure where to start? Click a track’s name (or a clip, or an empty spot in its lane) to choose the track, then tap C. The Cookbook slides out in the drawer at the right edge of the window, the same drawer the script and the ClipView use. You can also choose Audio ▸ Show the Cookbook; in Single Track Mode the frying-pan button on the favorites bar (Show the Cookbook) opens it too. It lists a handful of recipes, each a set of effects tuned for a specific style, such as: Clean and Natural, Corporate Narration, Auto Dealership, Audiobook, Strong and Vibrant, Warm and Pleasing and LibriVox.
The Cookbook in the drawer, beside the waveform. Scroll the list for the other recipes.
Listen before you choose. Click any recipe: it goes onto the track and your project starts playing from the beginning of that track's first clip, so you hear the difference in your project. Click the playing recipe again to stop, or click another recipe to switch to it and start over, so you can flip between A, B, C and D. Space still plays and stops too. The small Bypass button at the top right (or the B key) switches the recipe off at the same spot, so you can hear your own sound against it, A/B style; nothing is saved by trying them. The first card, Your current sound, is the track exactly as it was when you opened the Cookbook, so you can always get back to it. The number keys 1 to 8 click a card too, and Return is Use This Recipe. The cards use small type, so you see more of the list at once.
A fair comparison. Louder almost always sounds better, so the Cookbook matches loudness for you: every recipe comes out as loud as your current sound.
Audiobook and Audible. The Audiobook recipe holds your loudest peaks at -4 dB or lower, under the -3 dB limit that Audible’s ACX asks for. ACX also checks the average level (between -23 dB and -18 dB RMS) and the noise floor (-60 dB RMS or quieter), which depend on your recording, and it wants an MP3 (192 kbps, constant bit rate, 44.1 kHz). The ACX / Audible preset in the Export window makes exactly that file: MP3, 192 kbps, 44.1 kHz, mono.
LibriVox. The LibriVox recipe sets your voice to -18 LUFS, the middle of the -16 to -21 LUFS range LibriVox asks for, and keeps peaks at -1.5 dB or lower. Unlike the other recipes it is not matched to your current sound: it aims for LibriVox’s level, so it may sound louder or quieter than the others when you click between them. Then export with the LibriVox preset (MP3, 128 kbps, 44.1 kHz, mono).
Use This Recipe (greyed out while "Your current sound" is chosen: that card is only for comparing) puts the recipe on the track as one step (⌘Z brings back what the track had). Cancel, Esc, tapping C again, or anything else that takes the drawer (ShiftV for the script, I for ClipView, K for the Keyboard Guide, or dragging its bar) gives the track its own effects back, untouched. While the Cookbook is open, the rest of the project is locked against editing.
A recipe is a starting point. Every voice and microphone is different, so after you use one, tap X and open its effects to tweak them, then save the result as your own deck (next section).
Saving Your Setup as a Deck
Got a set of effects dialed in exactly the way you like it? Save it, and use it again on any track in any project. In the Effects Deck, type a name in the bar under the title, such as My Voice, and click Save Deck. Later, on another track or in another file, click Open Deck and pick it from the Decks list. The same effects appear in the same order, with every setting and bypass exactly as you saved them.
Opening a deck replaces the cards you have. It’s one step, so ⌘Z brings the old ones straight back.
Your raw recording is never changed by the deck itself. The effects are a layer on the track until you Apply them, so you can bypass the deck, or take cards off, whenever you like.
The Decks window lets you open, rename or delete a saved deck. (Decks used to be called filter chains; the ones you saved before are here too.)
Each deck is one small file ending in .deck, kept in ~/Library/Application Support/TuneTracker/Effects Decks/. Every TuneTracker product that has the Effects Deck uses this same folder, so a deck you save in one is there in the others. (Decks you saved before, in FastTracker’s old Filter Chains folder, were copied here the first time you started the new FastTracker; the originals were left alone, and the older .ftchain files still open.) To share one with a colleague, send them the file and have them drop it in the same folder. If their Mac is missing one of the effects, that effect shows as “(unavailable)” and passes the sound through untouched.
A Recipe for a Voice
Add three effects to your voice track, in this order, and press Space so you can hear what each one does as you adjust it.
1. Compressor: even it out
Voices go up and down. A compressor turns down the loud parts so the quiet parts can be heard, which makes a voice sound steadier and closer. Add Compressor from a card’s Choose Effect list.
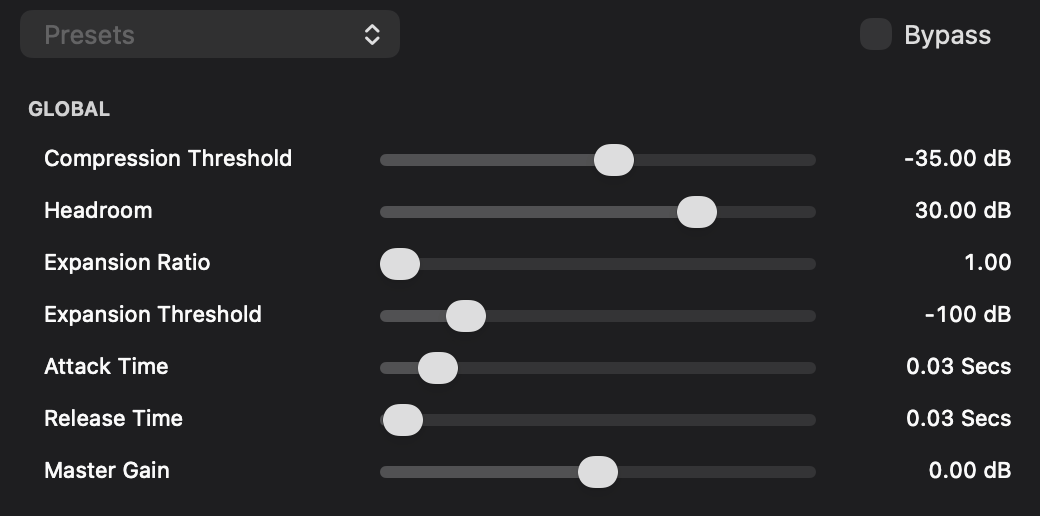
The Compressor window.
Compression Threshold is the level where compression begins. Lower it until the loudest words are being gently pushed down.
Headroom affects how firmly the compressor squeezes what goes over the threshold. Less headroom means stronger compression.
Attack Time and Release Time set how fast the compressor reacts and lets go. For speech, short-to-medium values sound natural.
Master Gain brings the overall level back up to make up for what the compressor took away.
2. EQ: clear the way
EQ turns specific parts of the sound up or down. Add a Parametric EQ to give a voice presence.
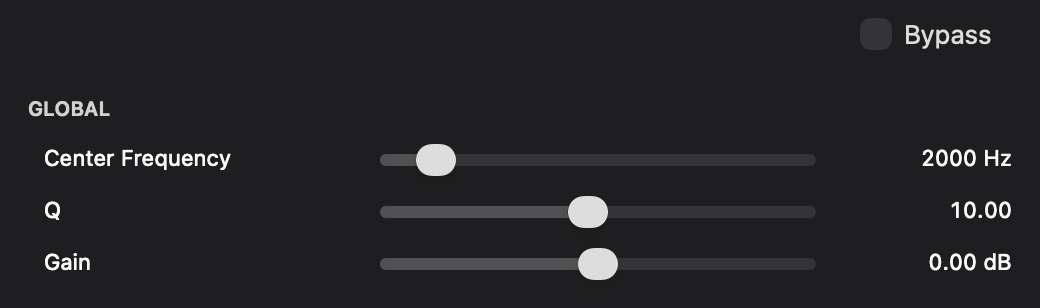
The Parametric EQ window.
Center Frequency picks the part of the sound you’re working on.
Gain raises or lowers it. A small boost somewhere around 3 to 5 kHz (try about +2 dB) can make a voice more intelligible and “forward.”
Q sets how narrow the change is. A low number is a gentle, broad hump, and a high number is a surgical nip.
💡
Want to get rid of low rumble, such as desk thumps, air-conditioning, or plosive puffs? Add a High-Pass Filter and set it low. It’s a quiet, unglamorous trick that makes voices instantly cleaner.
3. Reverb: just a touch
A little reverb gives a voice some space so it doesn’t sound like it was recorded in a closet. Add Reverb.
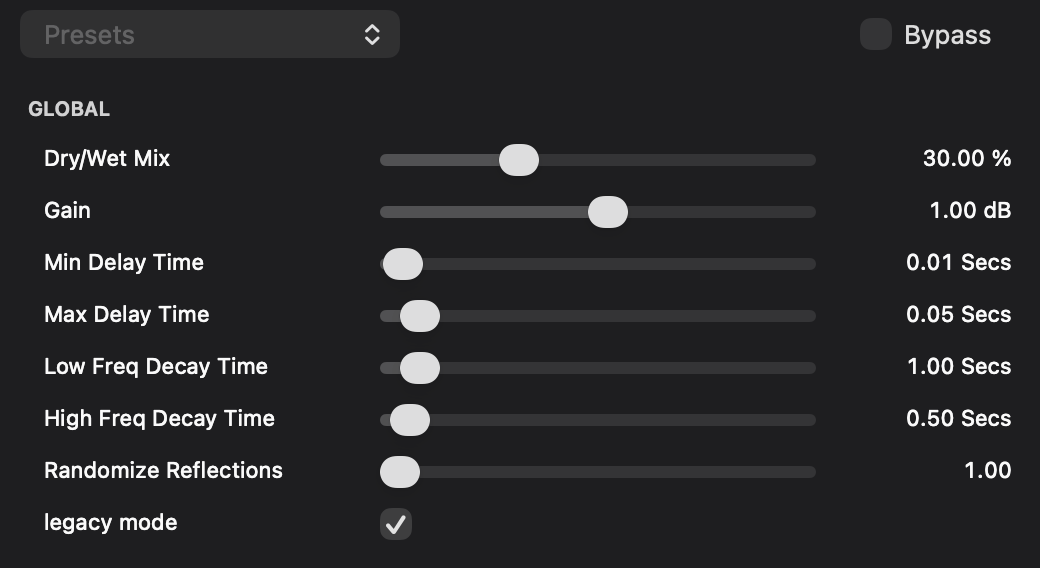
The Reverb window. The Dry/Wet Mix slider is the one that matters most.
Find Dry/Wet Mix. That slider sets how much reverb you hear compared with the original voice. For a voice, keep it modest, something like 10 to 20 percent. The Presets menu (Hall, Plate, and so on) changes the character of the room, not the amount.
📝
A new Reverb starts at a 30% wet mix so you’ll hear it right away, which is usually more than you want for speech. Turn it down until it’s a hint, then toggle Bypass to hear what it’s adding. If you can only tell it’s there when you turn it off, you’ve got it right.
Reverb and delay tails ring out past the end of the clips during playback and export (up to six seconds), so a voice doesn’t get chopped off mid-echo.
The Sky Is the Limit
That’s one recipe. It’s a good one, and it’s only a taste. The effects on offer include compressors, limiters and multiband compressors; parametric, multi-band and graphic EQs; filters and shelves; reverbs and delays; pitch tools; Sound Isolation to tame a noisy recording; and a few more. Each has its own controls, and the right settings depend on the voice, the room, and the mood you’re after.
A complete course on audio effects is beyond what a user’s guide can do, and honestly, you’ll learn far more by listening. A good way to dig deeper is YouTube: search for “how to compress a voice,” “EQ for voice-over,” or “reverb for beginners” and watch someone work. The principles are the same in any audio program, and what you learn there carries straight over to FastTracker’s effects. Experiment, bypass, compare, and trust your ears. Your original audio is never changed by any of this, and ⌘Z is always there.